As we’ve developed Tenable’s cloud security program, we in the Infosec team have asked many questions and faced interesting challenges. Along the way, we’ve learned valuable lessons and incorporated key best practices. In this blog, we’ll discuss how we’ve approached implementing our cloud security program using Tenable Cloud Security, and share recommendations that you may find helpful.
Cloud security has become a top priority for many organizations due to the increasing complexity of cloud environments and the rising number of security threats. To help identify and manage these security risks, many organizations use cloud-native application protection platform (CNAPP) solutions. However, even with the best tools in place, you still need an effective strategy to maintain a strong cloud-security posture long term.
Over the last few years, we at Tenable’s Infosec team have encountered a number of cloud security challenges and have learned valuable lessons about how to develop an effective cloud security program. Like many of our customers, we’ve asked a lot of questions around responsibilities, remediation, metrics and reporting.
In this blog, we’ll discuss how we’ve approached implementing our cloud security program using Tenable Cloud Security, and include recommendations that may help you enhance your own security program. We’ll address issues such as the importance of establishing cloud-account visibility and ownership, and of ensuring account compliance using reports. We’ll also offer recommendations to help prioritize remediation efforts.
Set up cloud accounts
Regardless of how large or small your cloud footprint is, it’s important to know what cloud accounts you have. Whether you have production, development or sandbox accounts, or a combination of them, it’s important to determine what resources are running within those accounts and how they are used.
For example, if you don’t have full visibility into your cloud footprint, you can easily end up with resources that are overprivileged or publicly accessible, due to issues such as shadow IT, employee turnover and recent mergers or acquisitions. Knowing how your accounts are used can help you effectively organize and manage them within Tenable Cloud Security.
Before onboarding accounts, it’s important to determine how you want to structure them within Tenable Cloud Security. Whether you have multiple organizations or individual accounts to onboard, you can easily structure them within the console using folders. Folders provide a great option to logically group accounts based on business units, production or development environments.
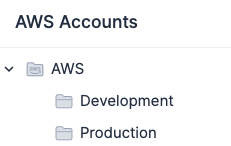
If you are onboarding an Amazon AWS, Microsoft Azure, Google Cloud Platform (GCP) organization or an Oracle Cloud Infrastructure (OCI) tenancy, you can configure your settings to automatically onboard new accounts and update the folder structure as your cloud environment changes.

Determine account owners
Once your accounts have been onboarded, next you will need to assign owners to your accounts. Account owners serve as the primary contacts and decision makers for their accounts. They are responsible for ensuring overall account security and they accept the risk on all excluded resources within the accounts, regardless of ownership.
We recommend having at least two account owners, with one of them being a manager or above. This setup not only provides a great backup solution, it also provides a contact that can make decisions about cost issues, address security questions, and approve access requests for that account.
As you work to identify and select account owners, we also recommend obtaining email addresses for each account. That way, security teams can contact account owners about any account-related issues. Reports can also be created within Tenable Cloud Security and automatically emailed to teams on a regular basis.
Choosing account owners can be time-consuming depending on the number of cloud environments you have. As your organization changes, we recommend keeping track of your accounts and owners outside of the CNAPP platform in a centralized, accessible location for all teams to review.
Set up access
Once you’ve selected your account owners, the next step is to establish who needs access to your accounts. First, we recommend reviewing which teams are accessing each account, the level of access, and number of resources they are managing. This information will help you to determine who the primary team will be for each account and what permissions they need within Tenable Cloud Security.
In most cases, primary teams include both the account owners and associated team members. However, access to some accounts may include just the account owners. For example, if your site reliability engineering (SRE) team manages many resources within your Production account, and has full admin access, they should be set as the primary team within Tenable Cloud Security.
Primary team members get assigned to the Collaborator role, which allows them to fully manage policy exclusions, and add manual labels to resources. By using this role, you prevent other teams with Viewer role access to the account from adding unauthorized exceptions on findings they may or may not own.
If you have multiple teams accessing an account, you may need to provide access to secondary teams within Tenable Cloud Security. Secondary teams get assigned to the Viewer role on accounts where they manage resources. This role is ideal to use if you have multiple engineering teams that manage resources within an account, so they can review and remediate findings.
Finally, your IT or Infosec teams would get access to the Administrator role in Tenable Cloud Security. This access allows them to onboard accounts, configure settings and integrations, and manage JIT access within the console.
Just like with your cloud accounts, not every team needs to have access to login and access resources. Implementing access controls using Tenable Cloud Security will help to ensure that authorized team members have access to approved accounts.
Monitor compliance
One major aspect of any cloud security program is ensuring compliance with industry standards that meet your legal, regulatory and business requirements.
Tenable Cloud Security provides many options to help you continuously monitor your security posture against standards such as the Center for Internet Security (CIS) Benchmarks, the General Data Protection Regulation (GDPR), and the NIST Cybersecurity Framework (CSF).
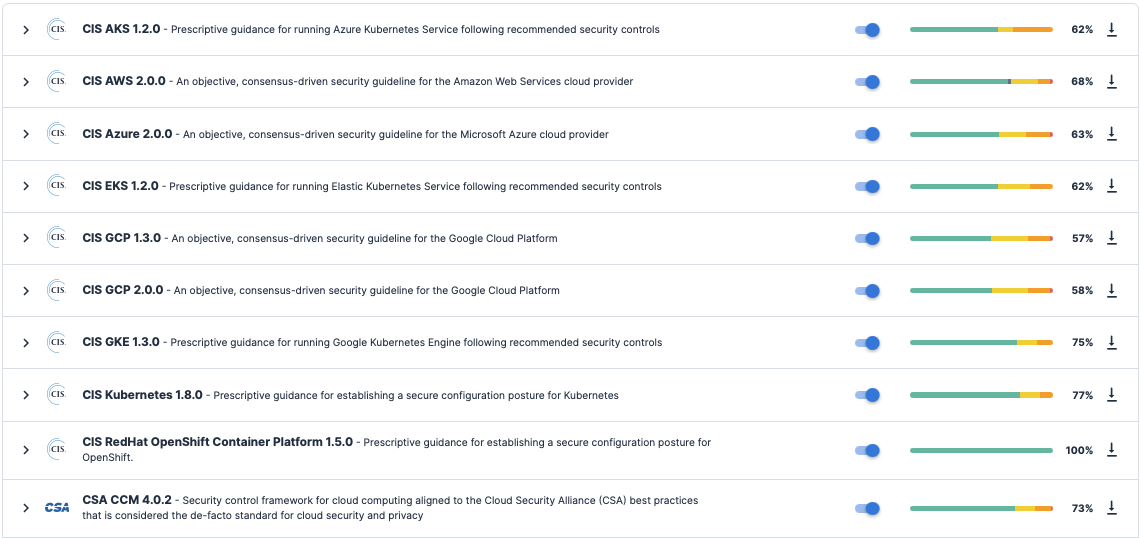
Before enabling those standards, you should determine what types of resources or data that you need to protect.
If you are running Kubernetes clusters, we recommend onboarding your clusters to Tenable Cloud Security for additional visibility and coverage on your Kubernetes and container environments. There are two convenient ways you can implement Kubernetes Security Posture Management (KSPM) coverage: either via Helm charts or by granting network access within the cluster. If you have any virtual machines or containers running within your accounts, you can enable Workload Protection to identify and report on vulnerabilities within your cloud workloads.
After enabling the compliance standards, you should work to determine which accounts to enable compliance reporting on. Adding a Scheduled Report using the Open Findings report type, you can select the accounts and compliance standards, set a delivery time, and then add email addresses to send the CSV attachment on a recurring schedule.
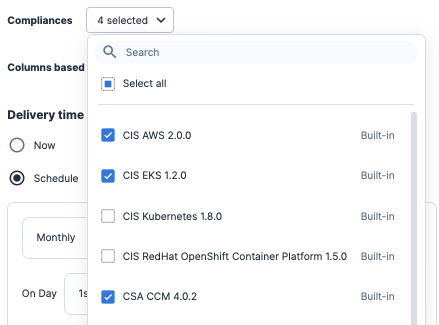
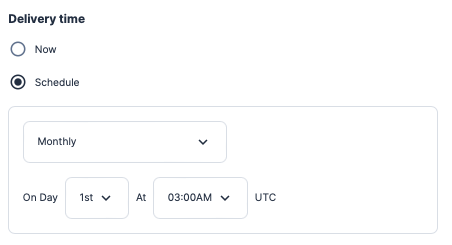
Within the console, team members with access to the account can download past reports that are archived in the Reports History section. Even if a team member does not have direct access to Tenable Cloud Security, that’s completely fine. Information within the CSV attachment includes all of the applicable information for anyone to quickly view the resource location, severity level and steps to remediate that finding within an account.
Review and remediate findings
When reviewing findings within Tenable Cloud Security, teams have often asked us where to start and how to prioritize those remediation efforts. We recommend teams first review resources within their account, and use the Tags filter to highlight the resources they manage.
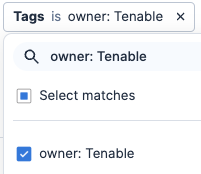
Having a consistent tagging policy is critical to any successful cloud security program, as it allows teams to manage resources by parameters such as cost, teams and purpose as your organization changes. Failure to tag resources on a consistent basis can lead to increased costs and to longer incident response times, and impact compliance efforts.
If you don’t have a consistent tagging policy implemented within your cloud infrastructure, the Labels feature within Tenable Cloud Security provides a great option to help with those efforts. Teams with Collaborator or Administrator role access can use automatic Labels that are applied based on tags, or manual Labels that are applied to resources.
So if you have IT, Engineering, or other teams that manage resources in your account, or if the target resource doesn’t support tagging, using Labels provides a great solution to quickly identify resource owners, which will help with remediation efforts.
When you are ready to address findings, we recommend prioritizing remediation efforts in this order.
- Address resources with critical and high severity findings.
- Patch operating systems that are outdated or nearing end-of-life.
- Review and remediate overprivileged resources.
- Remove exposed secrets.
- Delete all unused and inactive resources.
Tenable Cloud Security also provides options to send alerts to team members via email or Slack about resources based on specific criteria within your accounts. These suggestions provide a good starting point to help you decide what needs your immediate attention and what can be addressed later on.
Exclusions
In any organization, there will always be security issues that are left unaddressed for a variety of reasons. After remediating findings, you may have resources that you need to add exceptions on. Tenable Cloud Security provides options for permanent and temporary exceptions to meet your organizational requirements. For permanent exceptions, we recommend two use cases where exclusions are granted and considered acceptable:
- You have a compensating control in place that mitigates the risk.
- You cannot remediate the Failed finding due to an explicit business use-case requirement.
Regardless if you have a corporate policy in place or not, it’s important to hold account owners responsible for excluded resources for the accounts they manage. Once a finding is excluded, it becomes part of the risk-acceptance process and will impact your overall compliance scores.
Within Tenable Cloud Security, you can add exclusions in several ways. Examples of permanent exclusions could include any public-facing resources that might be used by customers, such as an AWS EC2 instance, bucket or storage account. Time-based exclusions could be resources with vulnerabilities that can be patched within a future sprint. If the deadline is missed, that exception expires and the resource finding will move back to the open findings queue.
You also have the option to manage exclusions for each policy that allows you to exclude resources either individually or by pattern.

When excluding a resource by pattern, you have the option to add by Amazon Resource Names (ARN), Name or Tag. This feature allows you to exclude multiple resources at once across your organization.
Key performance indicators (KPIs)
Once you have addressed your findings, the next step is measuring compliance metrics and performance over time. Key performance indicators (KPIs) are used to assess an organization's compliance efforts against a known compliance standard. As part of a mature cloud security program, tracking KPI metrics on a monthly basis is a good starting point. It’s also important that you work with your leadership team to determine and agree on a set of KPIs to monitor as part of your program.
One example of a KPI could be to maintain at least 85% or higher for a passing compliance score. Once those KPIs are determined and agreed to, teams can track those changes under the Dashboard section within the Tenable Cloud Security console.
To monitor those changes, first select the target account within the upper right corner of the console. Under the Dashboard section, review the Compliance widget to monitor changes over the last 7, 30, or 90 days.
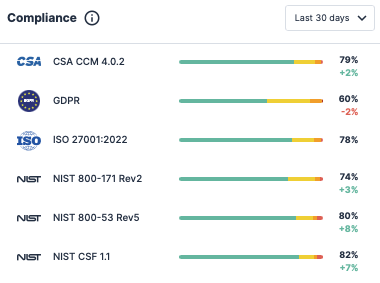
You can also review a breakdown of compliance scores under the Compliance section.
![Track cloud KPIs with Tenable Cloud Security]()
Present cloud security program to account owners
As a final step, we recommend meeting with account owners to go over the details of the cloud security program. When presenting this information, it’s important to discuss the reasons for implementing this program and what account owners are responsible for ensuring. Account owners should be aware that a cloud security program is designed to help ensure data privacy and regulatory compliance, as well as protect against security risks.
It’s also important to communicate with account owners what accounts they manage and will have access to within Tenable Cloud Security. For compliance reports, details on what will be provided to account owners should be included. Providing suggestions on how teams can get started by reviewing and remediating findings will be helpful. Also include information on the exclusion process and the acceptable use cases for your organization. Lastly, include what KPIs account owners should aim for.
Creating an internal documentation page that includes the account name, applicable compliance standards and account owners will be helpful as a reference for existing and future account owners.
Conclusion
Developing a cloud security program isn’t just a one-time rollout. Maintaining a strong program is a constant effort that requires support from all teams within your organization. We hope that the lessons learned and best practices we’ve shared here will help you boost your cloud security program strategy with the aid of our comprehensive Tenable Cloud Security solution.
To get more information on Tenable Cloud Security, and how you can use it to enhance your cloud security program, check out the white paper “Empower Your Cloud: Mastering CNAPP Security” and blog “If You Only Have Five Minutes, Here’s CNAPP in a Snap”.
